Related: FreeForm(1) EAPH.com Hosting Contact: rob@robshelp.com
FreeForm2 eBay Template Builder Feature Highlights
Feature Highlights
FreeForm2 automatically produces "Mobile Device Ready" eBay item descriptions. Learn how FreeForm2 makes it easy to fine tune eBay item descriptions for viewing with a mobile device: Mobile-Ready
Visual Design Tools
Example Tool Panel
screen shot - click to enlarge

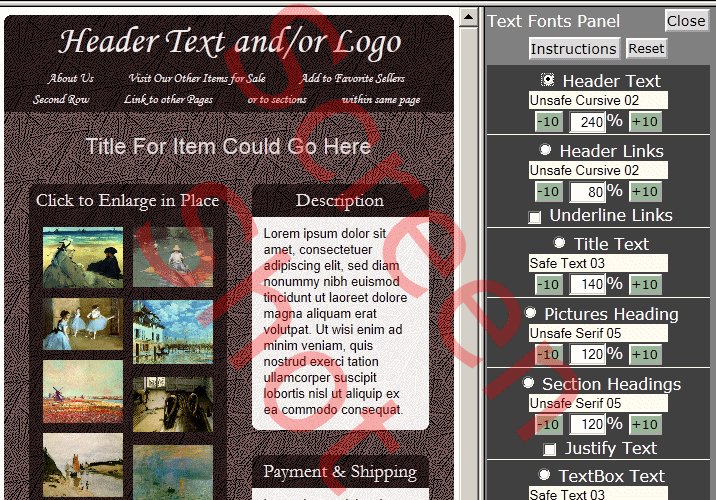
The template being worked on remains in view while using FreeForm2's design tools. The screen shot to the left is an example showing the Text Fonts Panel to the right of the template display area.

Text Fonts Panel
screen shot - click to enlarge

Here's a view of the Text Fonts Panel by itself. Rather than having to go into each section of the template to make adjustments all the fonts and font sizes used in the template can be changed and their sizes adjusted from this panel.

Settings changed in the panel apply directly to the template so you can see the results immediately. The "Reset" button is available to put all the fonts and sizes back to what they were.

Colors and Textures Panel
Screen shot - click to enlarge

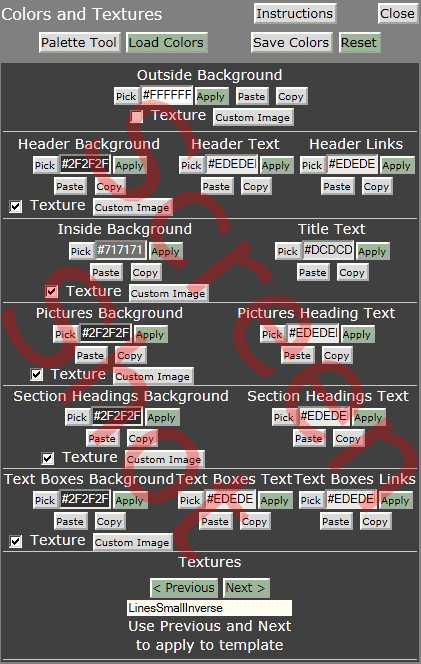
Change colors and background textures used throughout the template from this panel. The template display area remains in view while using the panel so the results are visible immediately. As with the Text Fonts Panel, a Reset button is available to put them all back to what they were when the panel was opened.

In many cases the same color will be desired in more than one place. The Copy Paste buttons provide for convenient copying of a color from one place to another in the panel.

The panel provides for cycling through an extensive library of semi-transparent textures applied directly to the template to see the result. Because there are about 6 million HTML colors available to use, the combination of a particular set of background colors and texture assigned essentially becomes your unique look. Textures are optional, just uncheck the Texture boxes if you don't want to use them.

Custom backgrounds may also be assigned. For example, if you own a professionally designed template, you could use the backgrounds created by the designer.

Monochrome Palette Generator
Screen shot - click to enlarge


Coming up with suitable combinations of background colors and text colors can be a challenge. Available from the Colors and Textures panel "Palette Tool" button, the Monochrome Palette Generator will help. Paste in an HTML color code or use the color Pick button to provide a "Seed" color. The generator mixes the seed color with various levels of black and white to produce various shades. The "3 color scheme" and "2 color scheme" apply colors from the generated palette directly to the template. Often, in combination with use of a texture, the 2 color scheme results in an appearance of partial transparency for the sections of the template. The 3 color scheme applies a lighter background color to the text boxes.

Color Picker
Screen shot - click to enlarge

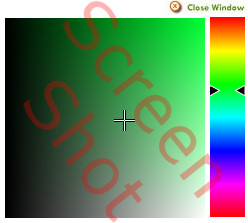
Wherever colors are editable in FreeForm2 this color picker is available to use. The slider going down the right side selects a basic color. Then use the mouse to move the crosshairs in the left area to pick a shade of that color.

Shell Layout Editor
Screen shot - click to enlarge


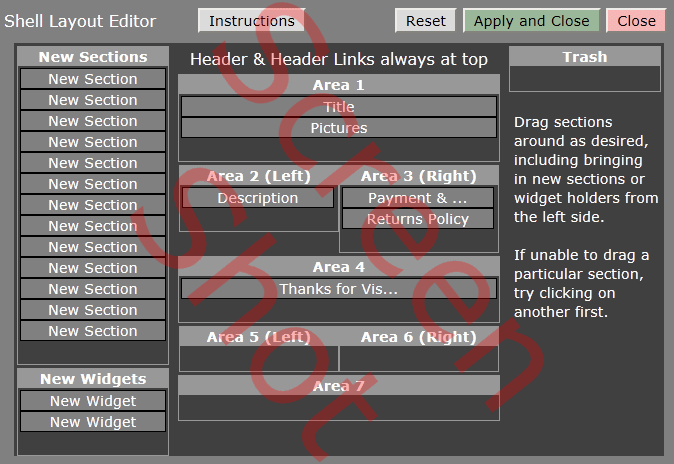
The Shell Layout Editor provides for rearranging the section layout of a template via simple drag and drop. Drag "New Sections" into an Area (1 through 7) where an additional section is desired. Sections consist of a section heading and text box. Widgets are also available to be placed into Areas. Widgets are holders for code acquired elsewhere, such as from YouTube to embed a video or from Vendio to display a scrolling gallery.

Drag sections into the Trash area to remove them completely from the layout. Once they're gone they're gone so be careful.

In FreeForm2 all the tools including this and the Best Fit (below) features are available to use at any time with your templates. As you create individual item descriptions you may adjust your templates on the fly as necessary to accomodate different amounts of content.

Best Fit
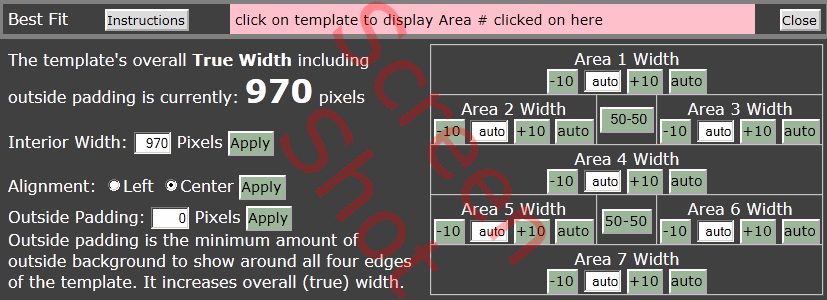
Screen shot - click to enlarge


The Best Fit panel provides for setting an overall width, adding outside padding, and adjusting column widths for each Area of the template. A "True Width" measurement is included to inform if content put into the template causes it to exceed its assigned (target) width.

Best Fit is available at all times for fine tuning of column widths to adjust for a varying amount of content put into them. The template is visible as this tool is being used to see the results of adjustments applied.
Lots Of Help Is Built In
Throughout FreeForm2 most of the buttons display captions (tool tips) when the mouse pointer is postioned over them. All of the tool panels contain "Instruction" buttons that open detailed information on how the tool works. The instruction pages have the option to be opened in new windows which provides for following along if desired as you work in FreeForm2.

Links Helper
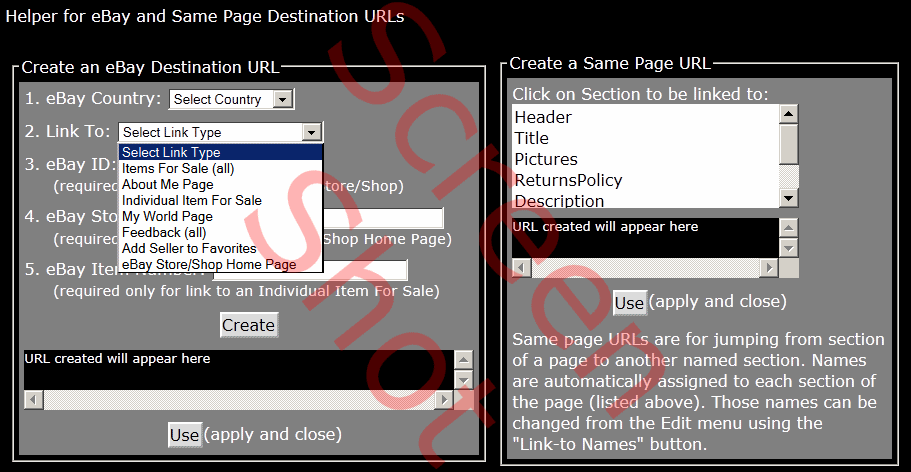
Screen shot - click to enlarge


The most technically challenging part of using FreeForm2 is creating links in the Header Link Rows. To assist with that, the Header Link settings include the Links Helper shown above. You may use the Links Helper to create links to your eBay pages or to sections within your item descriptions.
More Help Is Readily Available
Truly, I enjoy helping sellers create attractive and effective item templates and I've designed FreeForm2 as much for me as for you to get that done quickly and efficiently. The ability to save what you create (your work in progress) within FreeForm2 itself provides a wonderful opportunity for sharing...

You have ideas for how you'd like your content arranged and can at least get started doing so. If you run into difficulties or technical hurdles, save your work in FreeForm2 via the Save button in the Edit Menu panel then write to me at, rob@robshelp.com, including your login information. I can then load into FreeForm2 what you have been working on to make adjustments and/or provide any other assistance you desire.

In turn, when I'm done I'll save the results within FreeForm2 thus making them available to you to take over from there. Just like that!
Fast Contextual Text Editing
WYSIWYG Text Editor
screen shot - click to enlarge


While using FreeForm2 you'll spend most of your time with the Edit Menu panel showing to the right of the template display area. Simply clicking on a section of the template itself will bring up the WYSIWYG Text Editor for that section.

By default the content is displayed within an editing area equal to the width it consumes in the template. That way you can see what you are doing in the same visual context as in the template. If you want the whole width of the screen for entering text, uncheck the box labeled "Display workarea...".

Notice that images may be inserted into the content area. If you have graphics for section headings, dividers, etc. they can be incorporated into the layouts you create with FreeForm2. Use the Image Adjust button to change display size, align, add a css styled borders, add padding, and add mouseover text captions.
Top Notch Photo Display Options
Picture Sections
screen shot - click to enlarge


FreeForm2 makes available two sophisticated methods for displaying photos: "Enlarge in Place" and "Mouseover (rollover) Enlarge". See the Samples in FreeForm's Welcome page for examples. The screen shot above shows the picture selection methods and sequence adjustments common to both. With EAPH.com Hosting an entire folder of photos can be imported via the "EAPH Batch" button. With EAPH.com hosting photos can instead be imported individually via the EAPH buttons in each numbered slot. For all other hosting, typing or pasting in a URL is required.

Notice the presence of the Move buttons which allow for easy re-arrangment of the picture sequence.

EAPH Picture Import
screen shot - click to enlarge


The screen shot above shows the interface available with EAPH.com hosting for importing photos. With only a few clicks an entire folder of photos can be imported into the Picture Section of a FreeForm2 template either for use in an Enlarge in Place or Mouseover Enlarge display.

Enlarge in Place controls
screen shot - click to enlarge


FreeForm2's Enlarge in Place method is ideal for displaying photos in a medium size while making available a much larger view if the shopper desires. The same technique is used in this features page for each of the screen shots. The enlarged view displays quickly when clicked, the shopper stays in the eBay page, and by clicking on the enlarged view the shopper can cycle through the entire set if they desire.

The controls let you decide how large the "thumbnails" should be displayed within a choice of three arrangments. Below the controls a preview is shown to immediately see the results of changes made to the settings. Very visual so even if you aren't keen on reading instructions, by experimentation you'll quickly learn how this works.

You'll also appreciate that the settings used are preserved within the template itself. On a later date when loading your templates into FreeForm2 from saves to create individual item descriptions, putting in different set of pictures will go very quickly for you.

In two column layouts with the Pictures Section on either the left or right, it will usually be important to keep about the same width. Before and After section measurements are included in the controls as a guide. Very handy.

MouseOver Enlarge controls
screen shot - click to enlarge


FreeForm2's MouseOver Enlarge method is ideal for displaying many photos in a relatively small amount of space with columns of thumbnails down the left side of an enlarged view display area.

The controls let you decide how large the thumbnails should be, how many columns to use for them, and how large the enlarged viewing area should be. As with the Enlarge in Place method, a preview is shown below the controls to immediately see the results of changes made to the settings. By experimentation alone you'll quickly learn how this works.

If your template layout is very tightly constructed the before and after Picture Section width and height measurements shown will be very helpful.
Fast item description production
FreeForm2 isn't only for designing effective eBay templates. It's for creating individual item descriptions from them as well.

The process is simple. Save what you have created within FreeForm2 itself using the Save button located in the Edit Menu panel. On a future occasion, load that back into FreeForm2 from the Load Menu, then change only what needs to be changed using the editing tools provided.

No knowledge or direct editing of HTML is needed but even HTML experts would be hard pressed to modify the contents of a custom template faster than you can using one you've created in FreeForm2.

EAPH Method Saving
screen shot - click to enlarge


With EAPH.com hosting membership, an unlimited number of saves can be performed in FreeForm2 using the EAPH Save method. Three folders are provided for storage: Main, Archive, and Trash. The idea is to keep recently saved and templates you use most in the Main folder. Move those you want to keep but don't use often into the Archive folder. Trash is a holding area for those to be deleted. Sort and search is available to quickly find a save in each folder.

The Email Registration method provides 20 "slots" for named saves plus one QuickSave. Named saves can be deleted to make room for others.
FreeForm2 is supported by completely voluntary donations:
icon FreeForm2 © 2011-2014
Related: FreeForm(1) EAPH.com Hosting Contact: rob@robshelp.com
Image